Sunday, June 30, 2019

Peugeot tandem TM 8 - creative restoration

Peugeot Tandem TM 8 restoration


Tandem experience


During our summer holiday in the Grenoble region in 2017, we had rented a tandem for novelty and out of curiosity. After one week of riding in the mountains we were hooked. When it was time to give it back, the stoker asked whether we could rent it a few days more, and I started to search for a used one of the 'french-fendered' variety. We quickly settled on a mixed Motobecane Inter Club or a Peugeot TM 8 Grand Tourisme because of our size difference and a certain charm in their looks.

Peugeot Tandem TM 8 restoration


The perfect deal


We found our TM8 in Hannover for a very fair price, and arranged to make a small stop to pick it up at the central station right on the way home from our vacation. We were delighted to find out that the couple selling the bike had actually ridden it to the rendez-vous. There is certainly no better way to say good bye and show that everything is in working order. Once arrived home I immediately rode from the station to our house to get the car and fetch our remaining luggage. There can barely be a better way to take possession of a new bike.

Peugeot tandem TM 8
Peugeot Tandem TM 8.

Start of a long journey


The tandem had surely been ridden on and off over all its life which is good, as it allowed us to use it right ahead while working on different aspects, but many parts showed wear and tell-tale signs of previous generations and bike shops fighting with the ubiquitous french tandem idiosyncrasies.

Start of a long journey. The bicycle as advertised on ebay. We were delighted
to find out the couple selling the bike had ridden it to the rendez-vous. There
is no better way to say good bye and show everything is in good working order.

We had no illusion about the value of this bike. It is easily identified as a typical 10 speed bike-boom bicycle. And with this in mind we happily started experimenting, changing and repairing. When we understood that we would stick with tandem riding and wanted to restore this particular specimen, we decided to go for a creative restoration keeping the spirit, rather than originality.

Peugeot Tandem TM 8 restoration

Frame


The charming frame is fillet brazed and sports a few nice details, as the very french bi-plane fork crown, oval boom, eccentric bottom bracket and hellenic mixte stays. And while the overall alignment seems fine and it tracks straight, a closer look shows sloppy execution in many details and price cutting measures where possible. Maybe they knew exactly where to stop cutting before the ride quality suffers?


Peugeot Tandem TM 8 restoration


As the frame showed specs of rust, and we anyway wanted to make a few modifications, we did not hold back with the torch and decided to go for a re-paint. One key point we wanted to address was to remedy the lateral whippyness through triangulation of the mixte stays (more here). And while we were at it we would add decals of our own design (more here)

Peugeot tandem TM 8
Peugeot tandem TM 8.

Wheels


The wheels were re-laced using 36 hole silver polished Ryde ZAC 2000 rims. In the rear we kept the original Atom drum brake hub using Sapim Strong spokes on the drive-side and Sapim Laser spokes on the non-drive-side in a 2 cross pattern, in order to match the cross-sections to the tensions and to keep the spoke angles reasonable. The weak axle of this hub and resulting bearing issues appear to be legendary , but since the installation of a CroMo axle, Shimano cones, and new bearing balls we get away with it. The front wheel was build around a Shimano DH-3N80 dynamo hub in a 3 cross pattern with Sapim D-Light spokes.  The wheels have stayed true and not given any trouble until now. For the tires we went with the affordable Continental Contact Speed for their clean look despite the reflective sidewall that we wanted to have for this everyday bicycle.

Drivetrain and shifting


The TM 8 came originally equipped with the beautiful Stronglight 49 D crossover tandem crankset in 52/42 teeth double configuration with 32 tooth synchronization rings. Simplex Prestige delrin plastic levers (velobase) commanded a SX A22 delrin band double front derailleur (velobase) and a Peugeot branded SJ810 (velobase) in the back. The power is transmitted through a 14-28 five speed french threaded Atom tandem Freewheel which holds up well to the rigours of tandem riding with its large 4 pawl design.

Stronglight 49D tandem crossover drive
Sronglight 49d crossover drive.

The flexy Prestige levers tended to slip and were replaced by the amazing first generation Simplex SLJ levers (velobase).

Simplex SLJ retro friction levers
Simplex SLJ retrofriction levers.

As we found the gearing range too narrow for our strength and intended riding, we tripelized the chainset and added a 6-th cog in the rear.

Simplex rear derailleur
Simplex rear derailleur. A combination using the
parallelogram of a SX 410 and the long pulley cage from an
SJ810. (6-th cog not yet installed).

In the process we replaced the front derailleur by the excellent Simplex SJ A223 and modified the rear derailleur.

Simplex SJ A 223 triple front derailleur
Simplex SJ A 223 triple front derailleur.

The refurbished 52/42/30 chainset with 14/16/20/24/28/32 freewheel provides developments from 2m to 8.1m, and got us over many alpine passes with pretty reliable shifting. (more here). While we liked the original black rubber pedals with their reflectors, we have meanwhile swapped them for MKS sylvan touring EZY superior rinko pedals for quick disassembly for transport.

Brake systems


The TM 8 is equipped with 3 brakes: Weinmann cantilever brakes front and rear, and an Atom drum brake in the back. The Weinmann brakes are actuated via a MAFAC twin lever on the right, while the drum brake is operated with a MAFAC single lever on the left.

Weinmann cantilever brake
Weinmann cantilever brakes. They may or may not be original. As they are
mounted with MAFAC bolts, they were probably exchanged later.

The Weinmann cantilevers stop the tandem well, but braking on long downhills is limited by the heat capacity of the rims before they get too hot and potentially melt the butyl inner tube. Adjustment of the relative length of the two cables can be tricky.
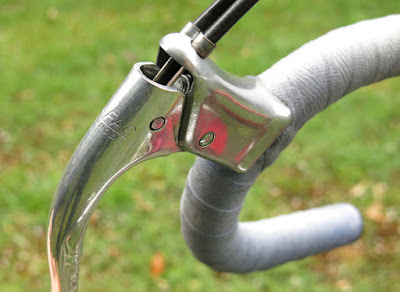
Mafac twin brake lever for tandems
Mafac twin lever.

The Atom drum brake does not really stop the tandem and is probably not intended to. But the self amplifying action of the drum makes for a light feel in the lever and the brake still scrubs a lot of speed. At the same time it can take a lot of heat before fading. This is really useful on long descents, where we use the drum to keep the speed under control on the straights and the cantilevers to brake into turns.

Drag brake: Atom drum brake hub
Drag brake: Atom drum brake hub.
Up to grades of 6% we have a lot of fun, around 8% we start to manage the brakes, and beyond 10% we begin to worry and stop regularly to let things cool down. That said, tandem braking is both art and science and riding a loaded Peugeot TM 8 over alpine passes is probably somewhat stretching the envelope.

Lighting


If there is one place where progress of bicycle technology has been striking over the last 40 years, its lighting. I do not miss the faint glow and low lifetime of conventional bulbs and the slip-stick-skip behaviour of many bottle generators. With the bike's current home in rainy Hamburg, and the decision  to keep the spirit but not originality, we went for a hub dynamo and led lighting.

Busch & Müller EYC
Busch & Müller EYC headlight on custom mount.

The front light is the excellent B&M Eyc, modified with a polished top and a custom mount (more here) for seamless integration at the original position. The beam pattern of this light is a pleasure to ride with, and the total power is adequate for tandem night riding.
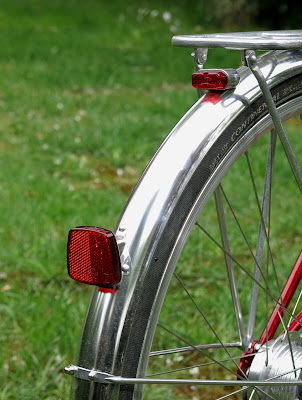
Schmidt SON fender mounted taillight und Busch & Müller Z-reflector
Schmidt SON fender mounted taillight and Busch & Müller
Z-reflector on custom mount.

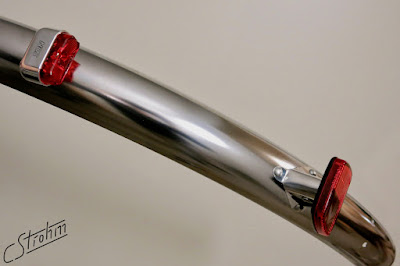
In the back we opted for the beautiful fender mounted Schmidt SON taillight, complemented by a custom mounted large area reflector (more here).

Shimano DH-3N80 hub dynamo
Shimano DH-3N80 hub dynamo.

The lights are powered by a Shimano DH-3N80 hub dynamo, we chose for its wide flange spacing, large flange diameter, good bearings, and excellent sealing. Proper cable routing was fairly easy through the fork, inside the rolled edges of the Gilles Berthoud fenders, and with the help of the original cable eyelets along the frame - a  nice detail common on these old frames.

Contact points


Captain: The original stem had been swapped for one with higher rise, and road handlebar and levers were exchanged for a touring noodle with flat bar levers by one of the previous owners. While I mainly went back to the original configuration to restore the looks, it quickly turned out that this was a wise decision: The light 'Guidons Philippe Atax Professionnel' absorbs road buzz and shocks very well, the geometry allows riding the tandem without fatigue despite its small width, and the racing position I am used to from my randonneuring bicycle fits me well. I discovered, that the narrow diameter of the bar wrapped in shellacked Tressostar cotton bar tape and the MAFAC levers allow me to find positions without pressure points easily. But most importantly, the combination of a racing position for the captain and a more upright position in the back gives the stoker more room and a better view, all while fitting our respective preferences! The simple and cheap Specialized Riva saddle I also run on my commuter bike is and remains one of my favourites.

Stoker: In the narrow stoker compartment there is not much room for adjustment, and suitable stems fitting the 25.4 mm captains seat post are not easy to find (early MTB ahead stems!). After quite some iterations, it turned out, that the length of the original Pivo stoker stem was just right combined with a riser bar with some backsweep. Only the bar had to be changed, as it had quite some drop towards the ends and its curves swept too far forward into the captain's thigh before sweeping back. For the saddle, the stoker also chose the same as on her commuter - a Selle Royal Ariel.

Rack and fenders


Unfortunately, only the rear fender was original, and the front fender had been exchanged.  We replaced both with the long version of the Gilles Berthoud stainless fenders in 50 mm width. This leaves room for tires up to 35-622. We extended the front fender with an SKS mudflap as long fenders are key to keep the stokers feet dry, and securely riveted the front light mount to the fender. The rear fender had to be dimpled to clear the chainstays and connects to the chain- and seatstay bridges. It carries the SON rear light and a riveted reflector mount. We modified the Pletscher Athlete rack that had been retrofitted by one of the previous owners,  so that it sits directly on the fender and connects with an M4 screw. A custom M6 daruma bolt combines both the rack- and the fender stays on each side respectively, so that fender and rack can be removed as a monolithic assembly for transport by loosening only four screws and a SON coaxial connector for the taillight.  

Frame geometry


Peugeot TM 8 frame geometry
Frame geometry. Click to enlarge.

There is obviously the question about the bike's weight. When we bought it, it was 22.7 kg. After the restoration and repaint it now weighs in at about 22.5 kg including bottles cages, frame pump, and still some possible gains. This is certainly reasonable for a fendered tandem complete with rack and lighting, and is likely still not too shabby compared with some production tandems. Its perfect considering its price. But a high end touring tandem can probably be still 5 kgs lighter which amounts to roughly half of the luggage we carry on a longer tour.

Epilogue


After the complete restoration with many new and new-old parts, there is the elephant in the room of what is actually left of the original Peugeot. And this implicitly raises the question whether a new or higher level used tandem might have been a better choice? Acquiring the Peugeot had started a process we thoroughly enjoyed. Owning this affordable bike had us confirm that we would stick to tandem riding. The adjustments and choices we made during the restoration taught us what goes where and why. And if we were ever to commission a high end or custom tandem we now know what to look for. But a thorough comparison with a well equipped modern rental Tandem had us return to our vintage steeds and really appreciate their design choices even more. Yet still - is it justified to invest so much thought and time in a frame of sloppy construction from lesser materials equipped with obsolete components?  We actually like the feeling of connectedness resulting from the short stoker compartment. We found out that restoring the frame and components to perform in proper condition and context revealed a beautiful ride quality that lead to the great memories we have created riding this bike. And to come back to the question of what is actually left from the original, the answer must certainly be: its soul. About 40 years ago, french bicycle makers definitely knew a thing or two about what makes a good ride!

More build- and restoration-details:


Cyclotouring with the Peugeot TM 8


Touring the French Alps on a vintage Peugeot Tandem

A hanseatic autumn trip with the Peugeot tandem

An Autumnal Tandem Jaunt to Plön

Image gallery of this Peugeot TM 8: on Flickr


Tuesday, May 28, 2019

Tandem restoration tidbits: Tripelizing the Stronglight 49D tandem crankset and one more cog

Peugeot Tandem TM 8 Col du Glandon
The original gearing of the typical 10 speed bike-boom tandem does not really
match todays expectations for loaded touring in an alpine environment.
Being produced in 1980, the Peugeot tandem TM 8 is a classic ten speed bicycle, with 52/42 chainwheels at the front and a 14-28 cassette in the back. And what is already a fairly narrow range of developments for a single bicycle by todays standards even on moderate terrain, is very limited on a tandem, and even more so as soon as there is any climbing. The comfortable cadence range for a team is narrower than for a single rider, in particular to the bottom end where its not as easy to ride out of the saddle. On the other side, a tandem easily reaches high speeds already on gentle inclines due to its aerodynamic advantage.

I thus was looking for a solution, especially to extend the bottom end:
  • There are some 5 speed thread-on wide-range freewheels. But they are not very common, the gear steps feel already slightly large and finding a well preserved specimen on a tandem freewheel with french threading appeared close to hopeless.
  • Another option would be to use at least the smallest inner ring available for the Stronglight five-star crankset with a bolt circle diameter of 122 mm. It appears to be 38 teeth (source), but again I couldn't find any and it wouldn't be a massive gain.
  • Converting the Stronglight 49 D crankset to a triple, which is again rare, or using Specialites T.A. chainrings (or one of the modern copies) to build a compact or triple setup turns out expensive. And the original 49D double with the trapezoidal cutouts in the outer 5-star chainring is particularly beautiful and its easy to find spares.
In order to get a significant extension, I went for both a homebuild tripelizer and a modification of the Atom tandem freewheel with an added cog:

Tripelizing the Stronglight 49 D crankset 

Adapter plate to tripelize the Stronglight 49 D crankset with 5-star chainrings.
The inner bolt circle adapts to the 50.4 BCD crank, the outer bolt circle mounts
a modern standard 74 BCD inner ring.

I finally decided to make my own tripelizer, but instead of replacing the inner 122 BCD chainring, I made a design which directly mounts to the 50.4 BCD of the crank and accepts cheap standard 74 BCD inner rings with standard chainring bolts on the other side. Laser machining of the simple part from 4 mm high strength aluminium turned out to be affordable. Getting the inner ring to clear the chainstay requires an external spacer on the drive side. On the TA Axix crankset which the previous owner had installed in replacement of the original, this was possible without changing the spindle length or even entire bottom bracket: TA provides internal spacers to adapt the Axix to larger bottom  bracket shells. Use of a single spacer on the left (crossover) side made it possible to properly install the bearing preload with enough threads remaining for the lock-ring.

tripelized Stronglight 49 D tandem crankset
Tripelized Stronglight 49D crankset. Mounting the third chainring directly to
the 50.4 BCD of the crank keeps the light appearance of the trapezoidal cut-
outs in the 5-star chainring which according to some makes the 49D double
one of the most beautiful cranksets.
Shifting this wide range triple required a new front derailleur which I anyway wanted to change, as the original one had the plastic (delrin) clamp which has a tendency to crack. As we anyway had decided to modify the frame, I added a boss for a Simplex SJ A 223 direct mount triplederailleur.

Modifying the Atom Tandem Freewheel

As there was quite a large gap between the 28 tooth cog of the freewheel and the Atom hub brake on the one hand, and as I had a Specialites T.A. 32 tooth inner chainring left over from another project, I decided to add it as a sixth cog to the freewheel.
Sprocket adapter.

All that was required is a (laser cut) sprocket adapter and a few holes in the 28 cog of the original freewheel.
Atom tandem Freewheel
Additional 32 tooth sproket, adapter plate, Atom tandem freewheel with the last
sprocket drilled to mount the sprocket adapter.
Atom tandem Freewheel
Left, adapter placed on last sprocket, right additional 32 tooth sprocket.
Atom tandem Freewheel
Atom tandem freewheel before and after the modification.
Atom tandem Freewheel
Atom tandem freewheel before and after the modification.

Vintage shifting

Simplex derailleur and retrofriction lever
Vintage shifting. Simplex rear derailleur (modified SX410/SJ810) (6-th cog not
yet installed), Simplex SJ A223 front derailleur, Simplex SLJ retrofriction levers.

There are some negative opinions on vintage shifting out here:

"Touring with terror" ? Would you use a SJ 810 on a Peugeot Tandem (source)?
and there:
SX 410 (source).

that I enjoyed reading with delight - before owning this tandem. Fortunately our experience is a little different:
  • The combination of exactly these two 'dogs' - a Peugeot SX 410 parallelogram and knuckles (Disraeli Gears) with a SJ810 pulley cage (Disraeli Gears) does its job with period correct look and feel, and shifts even under load. The (too narrow modern) chain may occasionally skate on the smaller cog, but this is not the fault of the derailleur. The pull of the Simplex SLJ retrofriction lever is just enough to shift this contraption over 6 cogs in original 5-speed spacing. Cross chaining into big-big is not possible - maybe one day I will take out the jigsaw and make a custom pulley cage.
  • The Simplex SJ A223 (velobase) front derailleur shifts (a modern 6 speed chain) extremely well over our 52-42-30 tooth chainring combination.
Whatever this is worth. But then we rode this combo over the alps on a loaded tandem without issues.

Gear range and development


The addition of a 3rd chainwheel and a 6-th sprocket lowered the minimum development from 3.3 m to 2.0 m. What this means becomes clear in a simple example: Riding the loaded tandem up steep grade at a speed of 5 km/h, this increases the cadence from a  40.4 to 66.6.

Development in meters for a 35-622 tire. Tripelizing the Stronglight 49 D
crankset plus the additional cog lowered the minimum development from
3.3 m to 2 m.
For many passes in the Alps but even for some of the short but steep climbs in Blankenese close to our home this is just the difference between walking or riding the climb.


Sunday, April 28, 2019

Tandem restoration tidbits: Peugeot TM 8 frame modifications and repaint

The original pearlescent white hat quite a few scratches, some specs of rust and we didn't really like the original 'record du monde' transfers with checkerboard graphics. And as there were a few modifications we wanted to make to the frame we decided not to hold back with the torch and go for a repaint complete with our own decals.

Peugeot Tandem TM 8
Repaint: Before and after.

Peugeot Tandem TM 8
Repaint: Before and after.

Peugeot Tandem TM 8
Repaint: Before and after.

Among the modifications we wanted to make were:
  • conversion of the shifter boss threads from M5x1 to the common M5x0.8
  • adding water bottle bosses
  • adding a braze on for a Simplex 'direct mount' front derailleur to replace the orginial one with the fragile delrin band.
  • reinforce the 'mixte-laterals' in an attempt to fight some of the frame's lateral whippyness
  • add a chain-rest
  • add a cable housing guide for the rear derailleur
  • re-shape the lopsided twin fork crown which must have been brazed in a hurry and without alignment
  • slightly re-file some of the generally beautiful fillets
Frame modifications: brazing of an M5x0.8 insert into the original Simplex
shifter boss.

Frame modifiactions: An M6 threaded boss was added in order to
accommodate a Simplex 'direct mount' front derailleur.

Frame modification: Triangulation of the 'mixte-laterals' in an attempt to remedy
the whippyness of the frame.

Frame modifications: Added chainrest for rear wheel removal and transport.

Frame modifications: Three pairs of braze-ons for bottle cages.
Choosing a color was not obvious, and we hesitated between the original pearlescent white, some blue, toxic green, metallic orange and candy apple red. Pearlescent white was not available from the powder coater, we couldn't agree on any of the samples of blue in the shop, nor for the orange which can be hit and miss, and the toxic metallic green we found gorgeous on the sample tends to turn out differently on painted frames we saw in the shop, so we finally settled on candy apple red which I like on the Velo Velo Orange Pass Hunter, and which works well with the decals of our own design.

Decals: Manufacturer Peugeot.


Decals: Captain C. Strohm.

Decals: Stoker C. Tonner.

Decals: Headbadge and fork stickers.


Monday, April 8, 2019

Tandem restoration tidbits: decals for the Peugeot TM 8

With the frame out for powder coating came the time to consider the question of decals. We were admittedly not very fond of the orange 1980s 'record du monde' decals with black checkerboard graphics. And we did not see any good reason to restore our specimen of the Peugeot TM8 to original condition. But we thought it a nice touch, to give some hints to its country of origin, state of residence, owners, and manufacturer.
Decals for the creative restoration of our Peugeot TM 8 Tandem
Decal set for the restoration of our Peugeot TM8. Made in France,
restored in SH. The northermost german state and 'la grande nation'
fly the same colours in their flags. Cut-lines in pink, grey for trans-
parent areas.
Free from period and other constraints we went wild and got inspired by graphic elements from a wonderful Ducheron, exploited the coincidence that the country of origin and our state of residence fly the same colours on their flags, borrowed traits from a famous signature, and finally chose lettering the manufacturer used about 30 years prior.

Monday, March 18, 2019

Tandem restoration tidbits: taillight and reflector mount

German traffic regulations require bicycles to be equipped with a taillight and a large area reflector labelled 'Z'. And while the taillight and said Z-reflector can be combined into a single unit, I am not aware of any fender mounted option here.
Schmidt SON fender mounted taillight and custom reflector mount, Gilles Berthoud fender
Schmidt SON fender mounted taillight and B&M Z-reflector with custom mount
on Gilles Berthoud Fender.
There is a large choice of rack mounted taillights integrating the Z-reflector, but they somehow do not fit with the aesthetics of a vintage tandem.

Busch und Müller rear reflector with custom mount
Jigsaw exercise.
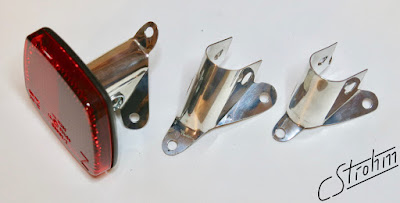
And among the many fender mounted reflectors, I could not find a single labelled 'Z' - which means it qualifies as a large area reflector (in contrast to simply 'optional' fender mounted reflectors).  The smallest reflector labelled 'Z' with a low aspect ratio is made by Busch and Müller and actually intended to be mounted on the seat post.

Busch und Müller rear reflector with custom mount
Prototypes and final result. The 'Z' in addition to the 'K' approval on the reflector
indicates that its a homologated large area reflector.

With that as a starting point I was now looking for a small fender mounted taillight without reflector and for a design to mount said reflector there as well.

First attempt and final shape.

This left me basically with two choices, the brand new Busch and Müller 'Mu', and the little gem made by Schmidt, which I finally selected. For the mount of the reflector, I was looking into a folded sheet metal piece picking up the theme of the headlight mount to give the whole seeing-and-visibility-thing some unity front to back.


Busch und Müller rear reflector with custom mount
Rear reflector riveted to the Gilles Berthoud fender.
I came up with another U-shape, wrapping the bulky mount originally linking the reflector to the seat post mounting band with a ball head. It took me some iterations with the jigsaw to find a workable shape, placing the reflector at the desired height.


Busch und Müller rear reflector with custom mount, Gilles Berthoud fender
4 mm plain alu rivets. Lightweight, strong, and do not rattle loose.
As for the headlight mount, simple plain alu rivets were chosen as fasteners for being unbeatably light, low profile on both sides, and absolutely insensitive to vibrations.

Schmidt SON fender mounted taillight and custom reflector mount, Gilles Berthoud fender
Fully STVZO conform taillight and Z-reflector escaping the
ubiquitous, and tiring look of the german-safety-add-on afterthought.


Saturday, February 9, 2019

Theme ride: Bremen to Hamburg

From the Bremen town musicians to Elbphilharmonie


With the brevet season starting soon its time to think about a little longer rides. And when the forecast announced a moderate breeze from south-west, we decided to go for a sailing trip from Bremen to Hamburg together with Jakob. The idea being to claim a few kilometres back from the wind.  After plowing into a constant headwind for 280 km straight during the time trial Hamburg Berlin lately for example, I didn't feel guilty to take advantage from the reliable tailwind that was announced for this choice of route. 

Bremen Town Musicians to Elbphilharmonie Hamburg
From the Bremen Town Musicians to Elbphilharmonie. One of the best views
on the Elbphilharmonie is from the square in front of the musical venues, just
before the old St Pauli Elbtunnel  (currently only pedestrians and bikes).

And it makes for a music themed ride from the Bremen Town Musicians to Hamburgs new landmark. Following largely the route of the bike trail Bremen Hamburg, large portions of the trip were on absolutely beautiful backroads free from traffic, - and open to the favourable wind.

Map. With a moderate breeze from south west this equates 120 kilometres of
pleasant downwind riding.
The wind forecast for Germany the 09.02.19 at 15h at 10 m looks promising.
Our ride direction indicated as a pink arrow.

The only thing we hadn't really anticipated were a few good spells of rain as part of the trade. Worth every kilometre, with the exception of the bike path along the busy state road between Neu Wulmstorf and Harburg, before the nice finish in the heart of Hamburgs harbor and with a crossing of the St Pauli Elb-tunnel.